Things have been a little crazy in my world... There was our Florida Trip, our move, school, and starting a new business! I have a few projects in the works and will get them posted as soon as I can!
Please do keep checking back!!!
With my one of my favorite holidays fast approaching, it was time to get started on my wreath. I searched pinterest for an inspiration wreath. I found several awesome wreaths but decided on this one (primarily because it's the only one my husband really showed any interest in).
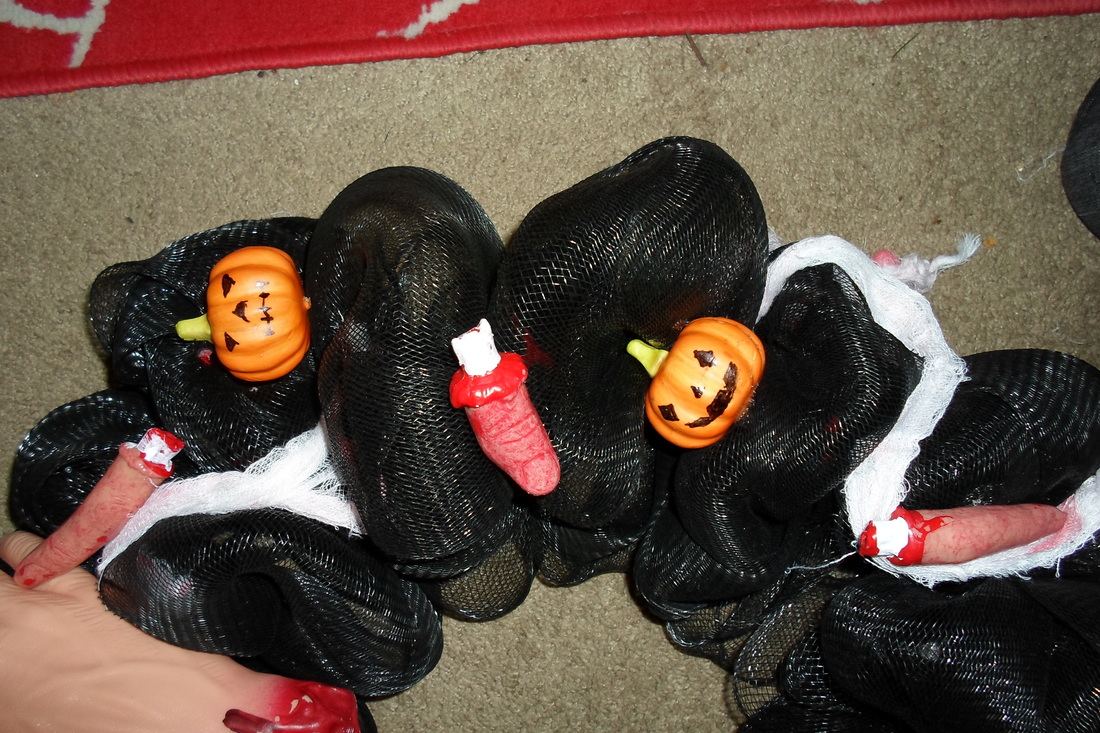
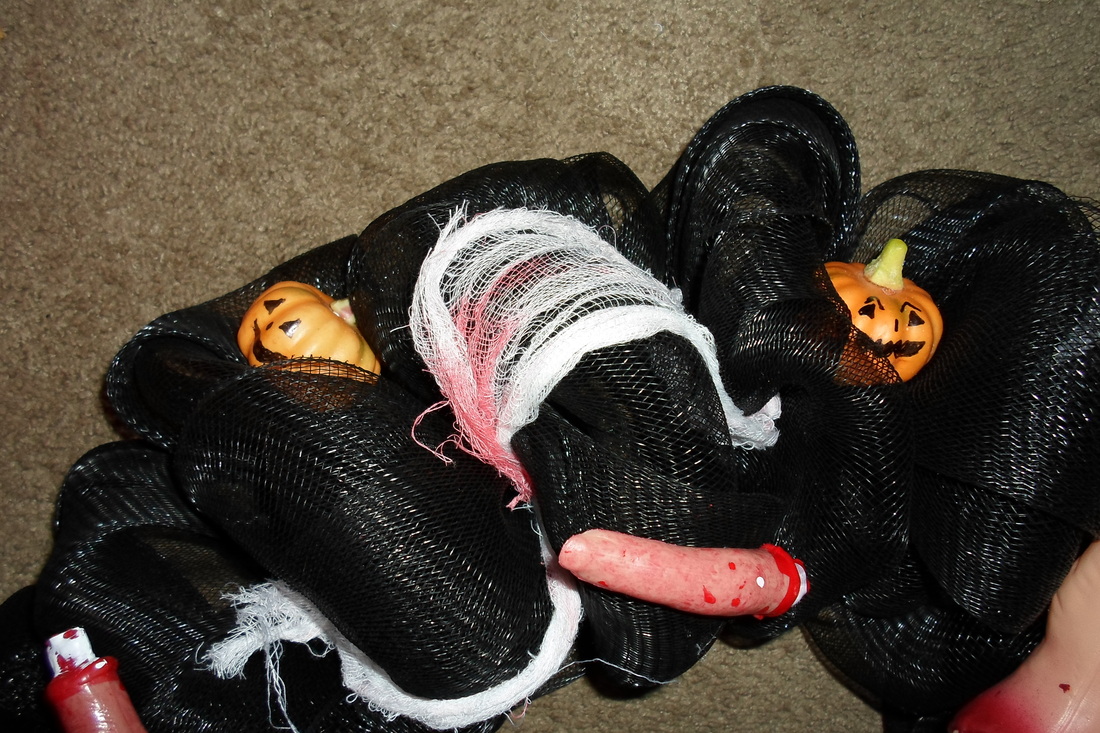
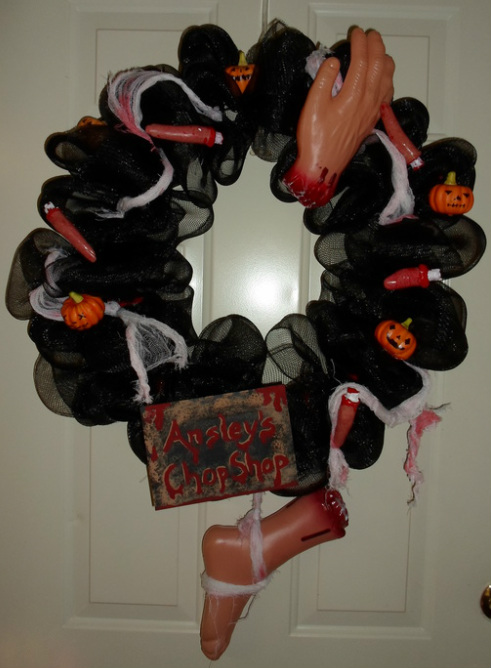 My Version 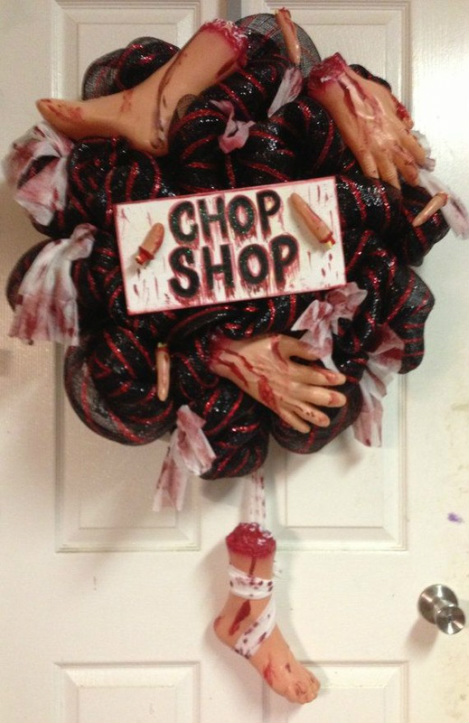 Inspiration Wreath This wreath was available for purchase on etsy at: http://www.etsy.com/shop/HighMaintenanceDes?ref=l2-shopheader-nameDes makes some amazing wreaths. But being the budget friendly girl I am, I couldn't bring myself to spend that much on a wreath. Sorry Des! So using her basic idea I headed off to the Dollar Tree and Ben Franklin Crafts to gather supplies. I decided to make mine a little less frilly... and less bloody. By the looks of it she added some blood to her gauze and body parts, none of the parts I found had that much blood on them. I'm sure some red paint could give you that same effect. Ok now for the how to part! To make my version you'll need: - A wire wreath frame
- your color choice in large mesh (I went with black).
- Pipe cleaners
- Bloody hands, feet and fingers (Dollar Store)
- Some bloody cloth (or make your own with red dye and some medical gauze)
- A small piece of wood for your sign
- Craft paints again in your choice of colors.
- Paint brushes (small for writing and blood detail)
- Your handy dandy glue gun
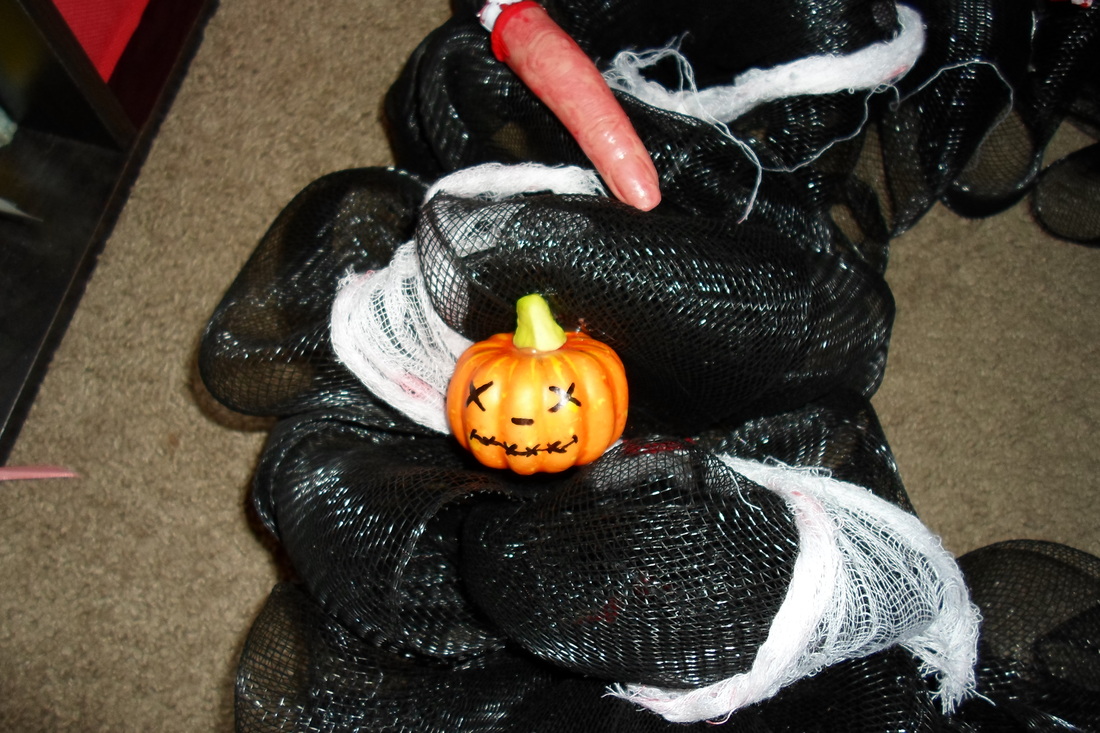
- Some little foam pumpkins
- A black sharpie
 You can buy wreath frames for making these mesh wreaths pre made but at $10.99 I'd rather spend a little extra time and get the $3.99 wire frame, and $.89 on the pipe cleaners.
Space out your pipe cleaners wrapping them around your frame I put 2 for every little section.
 Next you want to start gathering you mesh and attaching it to your frame. I saw on one site to gather the very end and use a little scotch tape to help secure it. (this did help, just wrap some extra tape around the frame)
I was able to go around the frame twice with the mesh. You can make your mesh loops as big or small as you want. If the loops are bigger then it comes out more like the inspiration wreath but that also makes it a bit more transparent. So you'll need 2 rolls of mesh.
 Once you have your mesh the way your want it start positioning your pieces until you are happy with how they will look. I drew little jack-o-lantern faces on my pumpkins with a sharpie, making each one a little different just for fun. (images below)
Tie on your gauze and tie the foot (or hand) to the bottom, hot glue all your pieces into place.
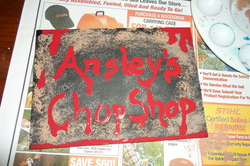 Once all your pieces are in place its time to paint our sign!
I spray painted the whole board black then sponged on some tan and painted on the wording and dripping blood.
(To make the normal red paint a bit more blood red I added a few drops of brown paint a drop at a time until it reached a shade I liked)
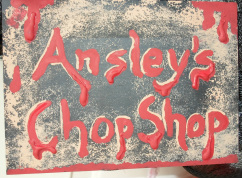 The wording didn't stand out enough for my liking so I highlighted it with some more of the tan paint using a thinner paint brush and to give the dripping blood a more 3-D look I added some hot glue and then painted over it.
Once your sign is dry Just hot glue it in place. My hot glue gun is dual temp. so I put it on low and just kind of held the sign in place until it was positioned the way I wanted it.
Pull out your Wreath hanger and enjoy!!!
Happy Haunting Everyone... Check Back soon for my Fall Wreath!
I want to apologize for not having any new post up yet!
My camera seems to have disappeared, or is more likely lost. I'm not up with the times so no smart phone and it costs way too much to send picture messages from my phone. I will be working on getting another camera so I can continue to post.
Thanks and again please keep checking back!
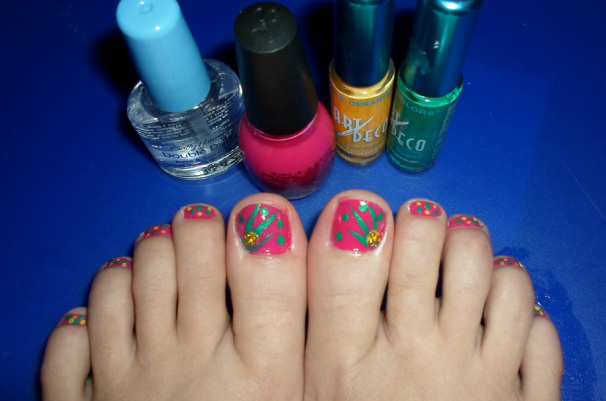
For me one of the best parts of summer is sandals... and that means getting all crazy with my toe nails! You've got to have cute toes to show off in those sandals, right? Lately I've been wearing a lot of pink, turquoise, and yellow so those are the colors I chose to work with today. (I must add that it's kinda tricky to do your toes while taking pictures, just an FYI) What you'll need: - A primary nail polish
- Nail Art polishes of your choice (I try to only do 2 or 3 colors at a time but their your toes so have fun)
- Clear top coat
- Rhinestones*
- Dotting tools* (bobby pins, q-tips, and toothpicks work well also)
- Nail polish remover and q-tips or cotton balls
* I got both of these on amazon if you get items that are sold by amazon an order of $25 or more will ship for free, their new add on items are great. They have everything a nail salon does only cheaper and you can do it yourself for less! 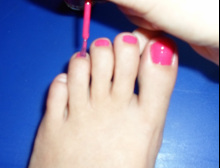 1. Prep your toes: remove old polish, clip, etc... Then apply primary color!
 2. Pick which of your nail art colors you want to show off most and do your lines. I always start from a corner and do the longest line first. You can go straight across at a diagonal or you can curve it a little.
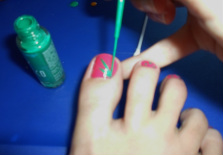
 3. Lets get ready to dot... If you're using three colors take a little of your remaining colors, and place a little puddle on a surface you don't mind having nail polish on. If you're using two like I did then do the same thing with both or your accent colors
(I use the top of 1 of my craft boxes its plastic & I don't care if it gets more paint on it)
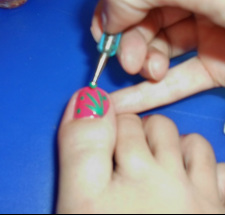 4. Now dip your tool in the color of your choice and dot your toe.. you want to make sure there is enough polish on there to get a complete dot. If the nail polish puddle is drying up you'll end up with a glob of paint or only half of a dot. If there is enough paint on your tool you should be able to get 2-3 nice dots before re-dipping.
(I used a bigger dotting tool for the big toe than the little toes. You want the big toe to be the most creative because it clearly has more room to work with and its too hard to see the smaller toes.)
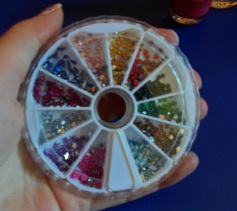 4. Now for the last part I'm still not too great at putting the little gems on without dropping them so I didn't get a pic of this step. I chose to use the yellowish gold ones on the top, they were round and I thought they'd complement the yellow dots I did on my little toes.
Using a dotting tool or a damp toothpick pull out a gem and place it on your still damp toes. Press down a little to help set it in place. Apply as many or as few as you want, again their your toes so have fun! Then put on your top coat using a little more around your gems to help secure them in place. Let dry and apply a second top coat... All done!
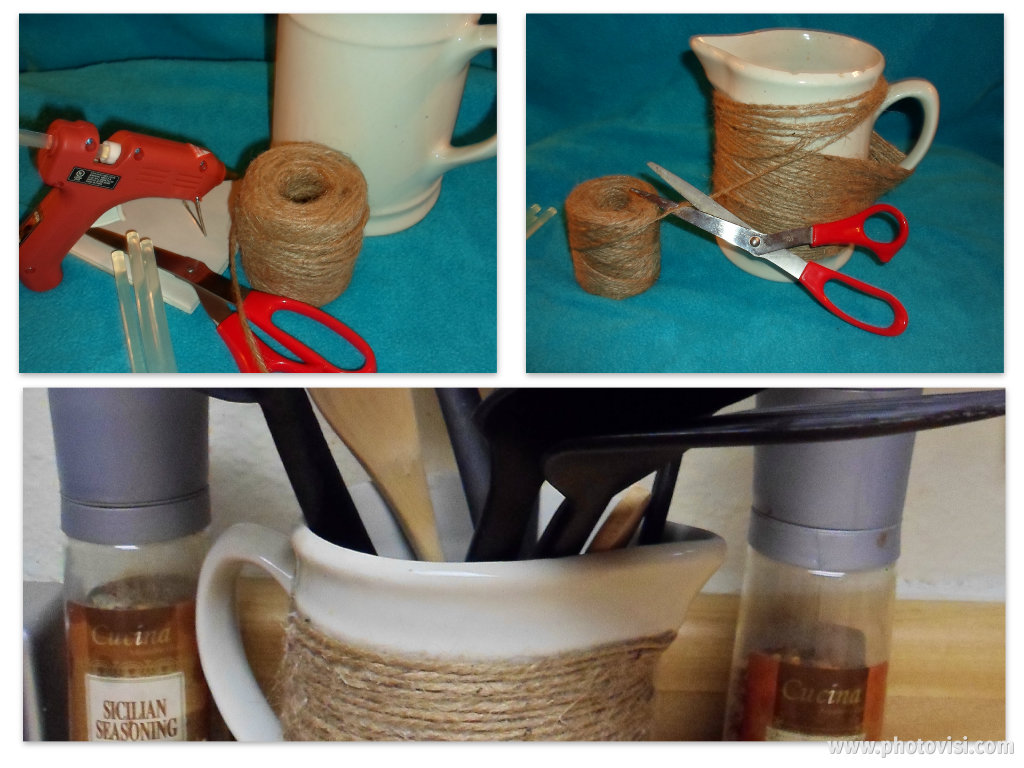
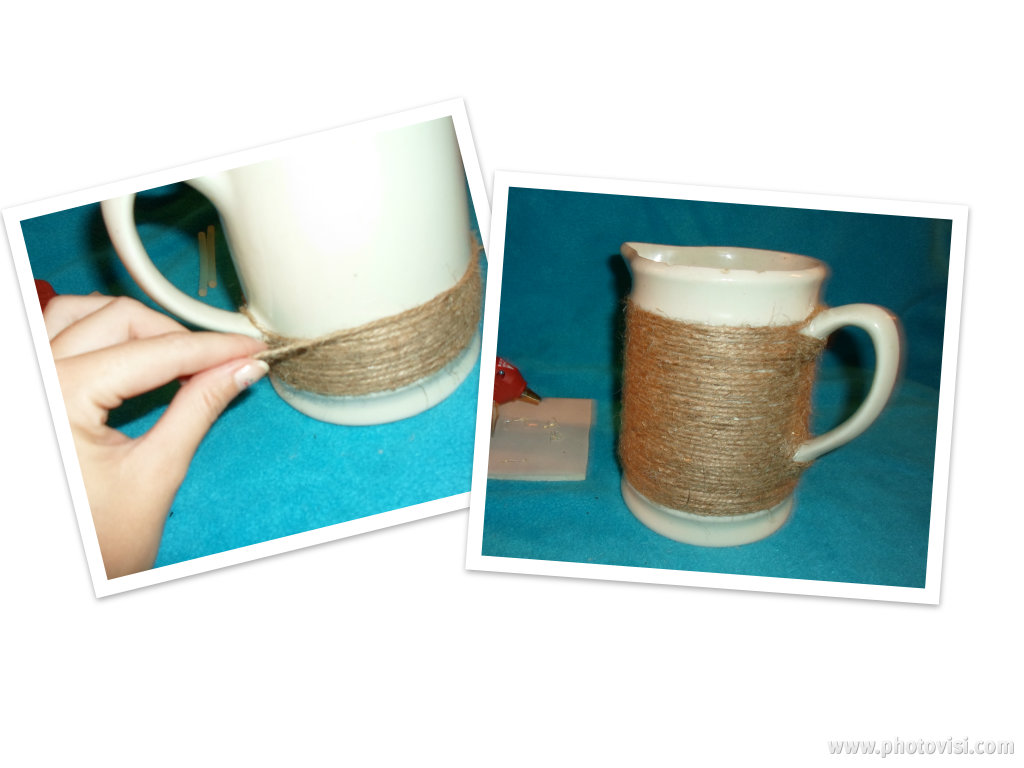
So you've probably been seeing all kinds of thing wrapped in twine or rope lately, I have and since I like the country, chabby chic look I figured I'd give it a go. I found this old milk pitcher at an estate sale over a year ago for $1 it has a few chips in the top which I think gives it character, and the twine came from the Dollar Tree. I have seen other crafters use elmers glue but, I was worried about the twine slipping before the glue had time to dry so I opted for the hot glue much faster drying time! What you'll need: - Twine, or thin rope of your choice
- A pitcher or canister of your choosing. (I love garage sales, thrift shops for diy projects)
- Your hot glue gun, and glue
- Scissors
- A little patience*
*this is a cute finished project but wrapping twine around a pitcher is very redundant and well kinda boring, I put on a tv show while I worked on mine. 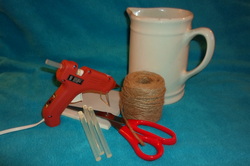 1. Plug in your hot glue gun and while that warms up lets get started. Because my chosen piece had a handle working with the whole roll of twine was going to be tricky, so I wrapped my pitcher with enough twine to be sure the area I wanted coverd would be. As you can see my pitcher has a great pre-measured border for me, and leaving the handle uncoverd will allow for more of the white to show through. *Snip* Cut your Twine, un-ravel, and let's put this bad boy together.
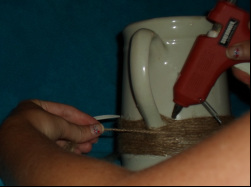 2. Now I chose to to start wrapping the twine below the handle this way if I had trouble hiding the end piece no one would really notice it anyways. For the fisrt I hot glued all around the pitcher pressing the twine in place as I went making sure that this row was nice and secure. To do that on every row would take hours so for the mid section I just glued it at quarter turns. Meaning I put a dap of glue pressed the twine in place turned the pitcher a a little bit and did another dab of glue. around the handle is where I put the most glue I wanted to be sure that the twine stay in place for as long as possible. For the top row I made sure it was also very secure by completly glueing this row down as well.
A lot of wrapping and glueing, and an episode of Supernatural later... Ta Da... you have an all new untesil crock! I'm not too happy about the fly aways so I'm trying to decide what to do about those. I'm thinking mod podge just to help lay them down and give it a little more of a finished look. I'll keep you posted.
Thank you for coming by to check out my blog any feed back, comments, and requests are welcome, but please keep them PG this is an open site and I don't want people getting offended by rude language or inappropriate content. Thank you!
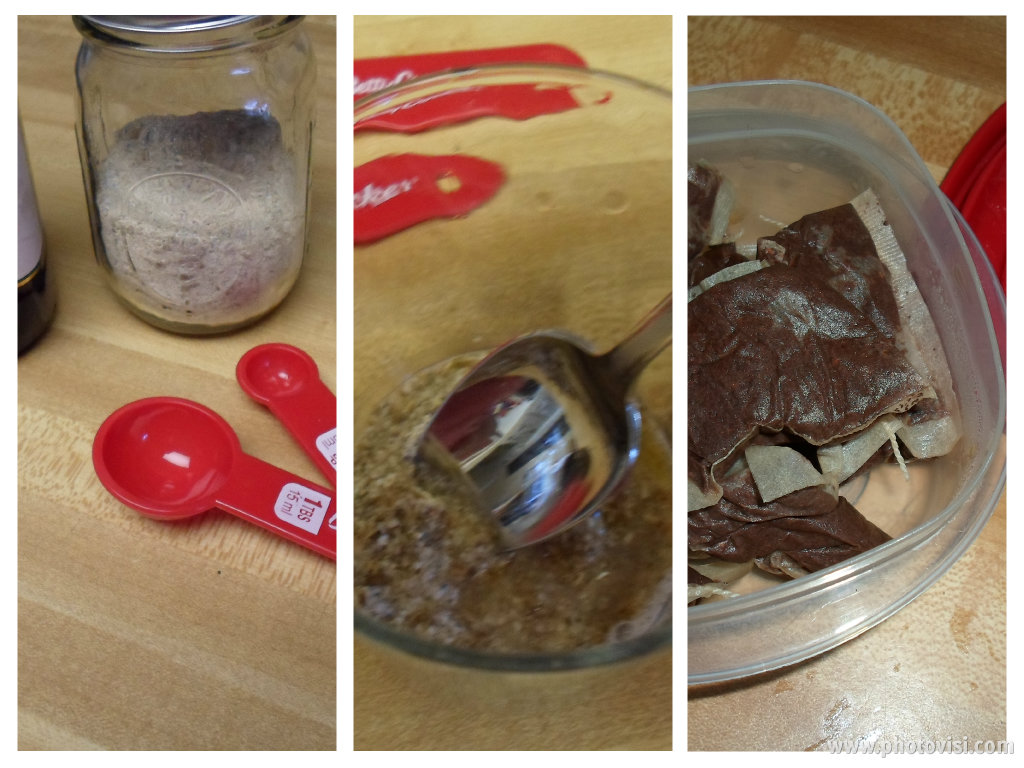
I love the oatmeal bath soak for sunburns and while it worked great on my shoulders, chest, and back its hard to soak your face in a tub for 20 minutes without doing some serious harm. My nose and forehead got the worst of it this time around so I decided that I'd try making a mask out of my lovely little oatmeal blend.
What You'll need:
- 2 Tablespoons Oatmeal Bath Soak *recipe in my earlier blog*
- 2 Tablespoons Water
- 1/2 Teaspoon E.V.O.O.
- 2 chlled tea bags
How to:
1. Add all your ingredients into a cup or small bowl 2. Stir until well blended, should be slightly runny, (if its too thick it will just fall off your face when you try to put it on.) 3. At this point I recomend putting on some of your favorite "mellow me out" music 4. Apply the mask using your finger tips to smooth it out as much as possible, 5. Lay down somewhere comfy and put the tea bags over your eyes. Relax for 15-20 min. * I put the music on so that I could time it about 4 of your favorite mellow songs should be about right. 6. Using a wash rag and some water remove the mask. * I took this time to use it as a mini scrub as well, take the wash cloth and using a circular upward outward motion gently scrub away the mask. 7. Rinse face with warm water, then splash with cool water, pat dry, and apply your favorite moisturizer... All done!
Hope you all enjoy this as much as I did.. with mellow music and the lavendar and chamomile aroma it was the most relaxing 20 minof my week!
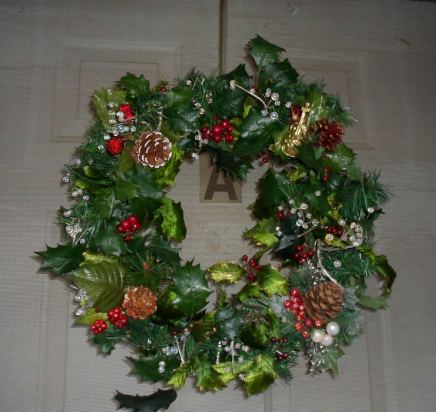
To me wreath making is one of the easiest crafts to start with... gets your creative juices flowing if you will. And you can find most everything you need at your local dollar store. Or better yet at a garage sale... yup, those ugly looking wreaths that the lady down the street is selling for a couple bucks is perfect! It has the wreath base and decorations on it. Just cut or pull them off and start it over again with some new things to give it a whole new feel! Christmas Wreath- That only cost me $2 Ok you might be thinking... How did this only cost two dollars? If your anything like me you have boxes and boxes of christmas decorations. (Chances are your Neighbor, Mom, Aunt, or Grandma are trying to get rid of some of their collection: whenever someone offers something at least check it out.) It just so happens this was the case for me, I took some of their old stuff and went through all of my old decorations to see what I thought would look good together. Most things are easy to pull apart, I got lucky with a wreath from a neighbor that had tied things on with a thin wire. I went to the dollar store and got a wreath hook ans one of their plain christmas wreaths, the greenery on thier wreath is pretty thin so your going to want another garland to help fill it out. Ok so once you have your wreath and all the "parts" from your old decorations your going to need: - a hot glue gun
- some needle nose pliers (my crafting pair is also from the dollar store)
- a good comfy space to work ( i like the couch and coffe table)
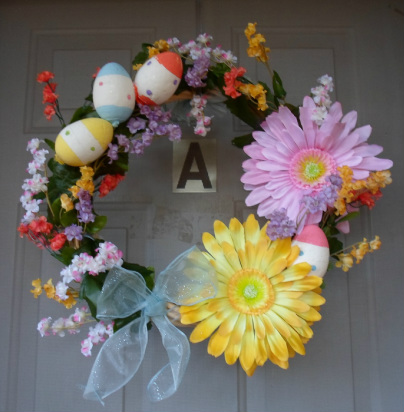
*if your parts don't have wires you may need some floral wire which can again be found at the dollor store.1. Wrap the garland around the wreath frame and hot glue in spots to secure it. (watch your fingures it's called hot glue for a reason, and it will hurt if you touch it) I ususally wait a few second and then press down and hold to make sure the connection stays. 2. Decide which parts you want to go where. arrange and rearange until your happy with it... not just "well I guess that's ok", but "Wow, that look good," kinda happy with it. 3. Now glue your parts into place, if they have wires on them hold them in place with one hand and tighted the wire around the vase withyour needle nose pliers with the other. * Hang it up on the door, and proudly show off your creativity!* Easter Wreath- This one cost $8.50 This one cost a little more but is still way cheaper than a store bought premade wreath. This is actually the second take... The original just had the eggs, daisies, and blue ribbon all of course from the dollor store and the ratan wreath form was a major thrift store find at only 48 cents. Wasn't thrilled with the original look so this year I added the little bunches of different colored flowers I found at Jo Ann's Fabrics during their spring sale for only 99 cents each. Another major plus to doing wreaths they are pretty easy to change or add on to!
This one is pretty much the same as the above you need to prepare all your Spring or Easter goodies, pull out the hot glue gun and get creative with it.
1. For the flowers cut off stems and leaves. Wrap the ribbon around your wreath form and cut about a few inches longer than desired length just so you have room to play.
2. I started with the ribbon and wish I hadn't so I would recommend starting with the placement of the leaves. just tuck them into the ratan wreath and play around with different directions a little (the leaves on trees and bushes aren't all facing the same direction so why should ours).
3. Once you have the leaves on re-wrap your ribbon and glue into place. *I always do the glue in the back so that nobody can see it, if you accidentally squeeze to hard on the glue gun you end up with a big glob of glue that isn't very pretty. lol
4. Now to add on your goodies. I start with the bigger pieces or what item i want to be the focal point of the whole arrangement. In this case it was the daisies, then I tried to even it out by putting most of the eggs on the opposite side. Arrange and re-arrange your flowers, eggs, and whatever else you want to add in until your happy with it... again not just kinda happy, this will be on your front door, so play with it until you know you'll be proud to say "I made that." when someone asks where you got it! Once your happy with it glue on your pieces allow the glue to harden and use that same clear wreath hanger to show off your creative side! Wreaths are a great, fun, and relatively inexpensive way to decorate for any season or holiday... you can even celebrate football season witha football shaped wreath form adding in your teams colors...So they don't all have to be super girly with lots of flowers. I will be making a few more soon to share with everyone so keep checking back and thanks for visiting!
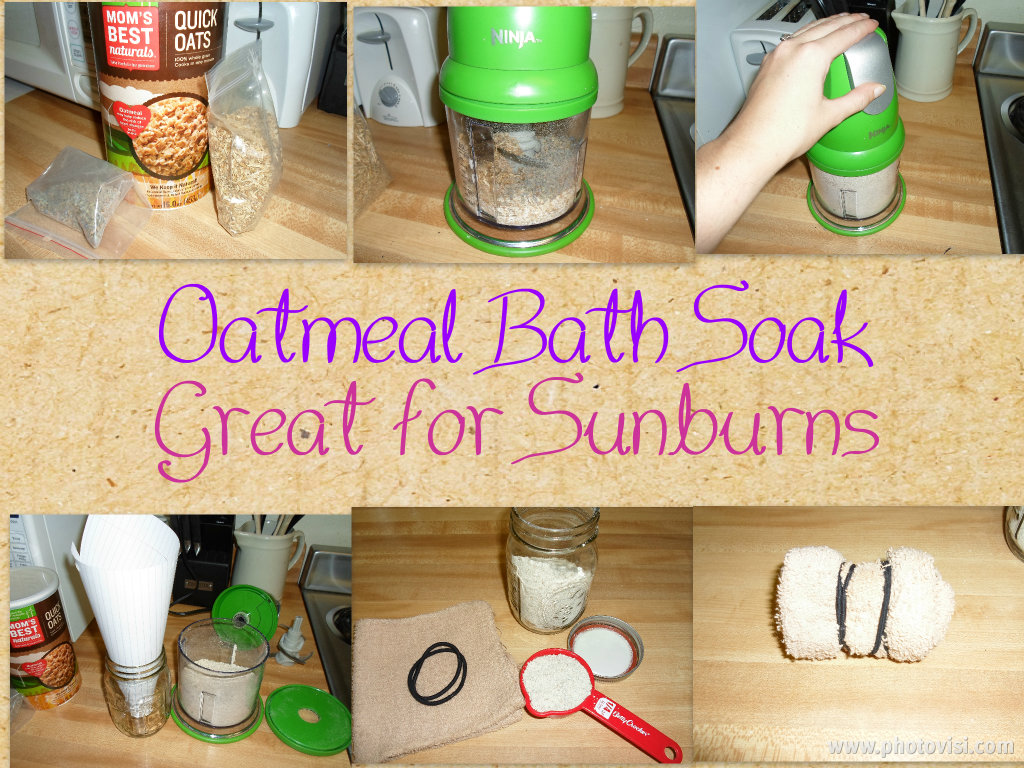
My least favorite part of summer is getting sunburned, and since I have a very fair complexiion that happens a quite a few times through out the season no matter how much sunblock I put on! I found this recipe on another site and the lady used all organic items, and a cotton tea bag. I didn't have organic everything, a cotton tea bag or panty hoes (another site suggests cutting the toe out of panty hoes and tying them shut to help the water flow through better) I also doubled the recipe and converted teh meassurements into cups. I have to give credit to the other site don't want to be accused of stealing: http://www.freshpickedbeauty.com/2011/12/baby-claires-soothing-lavender-oatmeal.html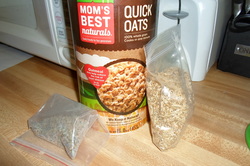 What You'll Need: - 1 1/2c Quick Oats or Old Fashioned Oats
- 1/2c Lavender
- 1/2c Chamomile
- a Ninja, bullet or other food processor.
- a mason jar or storage container with lid
- Wash cloth, cotton tea bag, or toe of a stocking.
- Hair ties or string.
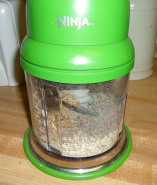 1. Grind the oats into a fine powder then add in the lavender and chamomile grind again into a fine powder.
*Caution: some people may be allergic to chamomile its part of the Asteraceae family so be sure to check if your giving this as a gift*
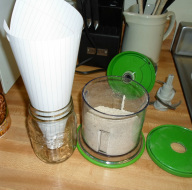 2.Transfer into your container... I don't have a funnel so I rolled up a piece of paper it works just as well and everybody has paper laying around.
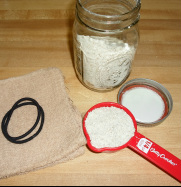 3. When you go to take a bath pour 1/4c of the mixture into the center of a wash cloth fold up the corners and twist slightly. Wrap a hair tye around the top to keep the oat mixture from spilling out but loosely enough to allow water to get it. If you wrap it too tight the water wont be able to get in and the center will still be dry.
I recommend using this about 2 days after your sunburn, when skin starts to get itchy. It will help soothe the itch, and surprisingly helps to prevent peeling. I've already used it twice and it's the best thing I've found to help lock in that sun kissed glow while helping to heal your skin from all those damaging rays! Enjoy!
This was one of those throw it in a dish and hope it comes out good kinda ideas... and what do you know it was a huge success! Shepherds Pie is always great and we love anything spicey in our house, so I just gave it a little twist and viola a delicious meal with very little prep time and only 30 minutes 'til done! Ingredients: - 1lb. ground beef
- 1 can black beans (drained)
- 1 1/2 cupps frozen corn (or 1 can of corn drained)
- 1 8oz. can of tamato sauce
- 1 package instant potaoes (I like Idahoan* Roasted Garlic)
- 4 slices American cheese (or shredded cheese of your choice)
- Tapatio
- Crushed red pepper
- Cumin
- Garlic salt
- Ground black pepper
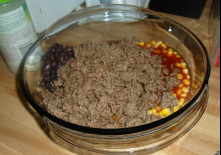 1. Start by browning the meet. While that's going open put black beans corn, and tomato sauce in a casserole dish (or a round cake pan works too just make sure you have foil to cover it) Add in your spices to taste... I shake them onto the tamato sauce and just taste it and add more if needed... Once meet is cooked drain the fat and mix in with your other ingredients.
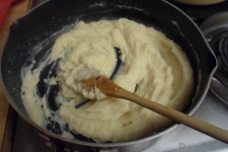 2. For the potatoes I just follow the directions on the back. (Bring 2 cups of water to a boil, remove from heat stir in spuds and mix until evenly moist.) I added a splash or 2 of tapatio to the water just for some more added spice.
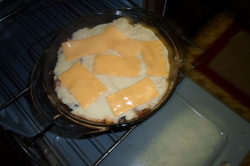 3. I let the dish cook for about 5 minutes at 325F then added the cheese on top. Cover and cook for an additional 15-20 min. Until the tomato sauce is boling up around the edges of potatoes.
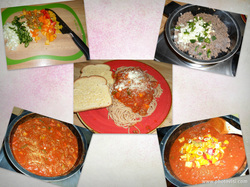 I believe that adding color to your food makes it not only more appealing to the eye but to your taste buds as well!
Ingredients: - 1 container of your favorite spaghetti sauce
- 1 8 oz. can tomato sauce
- 1/2 large yellow onion chopped
- 2-3 bell peppers chopped (I used mini bell mixed colors)
- 2 jalapenos
- 3 cloves chopped garlic
- 1 lb. Ground Beef
- Green Olives sliced *optional but I added about 12
- 1 pckg. Whole Wheat Spaghetti Noodles
* I also used: Italian Seasoning, Garlic Salt, Crushed Red Peppers, a little E.V.O.O. 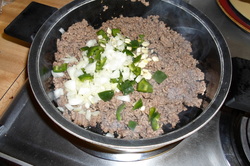 1. Season meat with Itialian Seasoning & Oregeno, brown the meat, drain fat. Then add in chopped onion, garlic, and jalepeno continue cooking until onion is translucent.
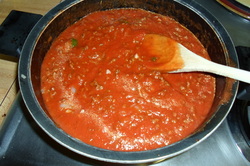 2. Add in both sauces and stir.
 4. Add in remaining chopped ingredients, stir and simmer on low for at least 20 min. *The longer it simmers the more flavorful it gets!*
 5. When you get the water ready here's my little trick I picke dup along the way: Add some E.V.O.O. and crushed red pepper to the water as it boils add in your noodles and follow package directions. * oil will help noodles from sticking together & peppers add a little extra kick*
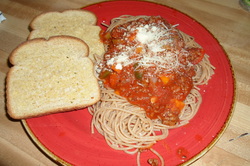 6. While noodles and suace are cooking... you can make yourself some garlic bread (or go for the pre-made bakery garlic bread). Just butter some bread sprinkle with garlic salt, and dust with parmessian cheese, throw in the broiler for a few minutes. *Watch closely so they don't burn.*
~*Serve up and Enjoy*~
|


 RSS Feed